Last post I went over some constraints. Somebody corrected me that they were actually conditions or filters. Even after searching, they still seem like the same thing. Either way, they’re both boundaries I’m setting for the selector. I’m not yet gonna say they can be used interchangeably, but for now we’ll stick with constraints.
So back to my basketball team. Let’s say I want to see all my players whose field goal percentage starts with 8, so the 80 percenters.
SELECT player, fgp FROM bball
WHERE fgp LIKE"8%";
The percentage in this command is called a wildcard character. This tells the selector to include any sequence of characters that follow that 8. If I just put 8 by itself, it would only look for the number 8. The percentage will search for any field goal percentage starting with 8. In this context, that should be strictly 80 percenters, unless there’s a player with an 8% field goal rate, which if he’s still on the team, I’d assume he’s a damn good passer or defender. But you get the point.
One more thing with this. An underscore is also a wildcard character, but it’s only used to specify the following characters after your beginning one. So if I put 1 underscore there instead of the percentage, that solves my problem of leaving out the player with the 8%, and it will still look for 80 percenters. But, some player’s numbers might have a decimal, like 82.3. If I only put that 1 underscore, that leaves out players with the decimals, because it’s only looking for 1 character after that 8. ‘.3’ is 2 more characters. So for this context, since I’m looking for the 80 percenters overall, the percentage sign was more appropriate.
You see how anal this gets, but we have to consider these things when looking for data. Like I said, the bare minimum is my enemy with this field. I can’t rely on doing ‘just enough’.
Next, we got a simple one. I want to view all my shooting guards (SG):
SELECT player, position FROM bball
WHERE position = "SG";
The equal sign takes care of that.
Let’s flip it. All my players who are NOT shooting guards.
SELECT player, position FROM bball
WHERE position != "SG";
The exclamation point behind the equal sign flips it to not equal to
So in the last post we learned how to specify columns.
Now in any table, all the rows have an ID number, like 1, 2, 3, 4…
In real-world data, there’s gonna be hundreds, if not thousands of rows. Not only will I be looking for instances, I’ll be looking for sets of instances with different factors applied to them, aka constraints. When it comes to this, scrolling and looking is not an option, at least not an efficient one. With this, we use the ‘WHERE’ command.
We’re gonna keep using my imaginary basketball team.
So let’s say I wanted to find a player by his ID number (not his jersey number, his place on the table). If his ID is 6 I would do:
SELECT id, name FROM bball
WHERE id = 6;
The name is necessary for this command because if you just left it at ‘id’, it would ONLY show that ID. You have to be very specific with these computers. There’s no room for assumptions. Any column you want to see, you have to tell it you want to see it.
Enough with the IDs now. Let’s say I want to see all my players who are between 6’3 and 6’7. I’m glad this language is keeping it straightforward so far because I would use the ‘BETWEEN’ command:
SELECT player, height FROM bball
WHERE height BETWEEN 6'3 AND 6'7
The top line selects the columns I want to work with. The bottom line adds a constraint to those columns, which was the range of heights in this case.
Now let’s flip it. If I want to see all the players who are under 6’3 or over 6’7, anybody who wouldn’t have been in that last table, I’d use the greater than and less than signs:
SELECT player, height FROM bball
WHERE height < 6'3 OR height > 6'7
This is the opposite of ‘BETWEEN’.
Lastly, say I want to see all the players 6’6 and under.
SELECT player, height FROM bball
WHERE height <= 6'6;
This first Python project is for a savings calculator.
The program should calculate how much a person can save in a year based on their income, hours worked, and cost of living. So that’s only 3 factors we gotta work with.
We’ll start with an intro string that says “Hello Bob”, but we have to use variables and combine them
So the first variable will be the greeting, “hello”
greeting = "Hello "
A major key with this is the space after “hello”. Without it, the output would put the 2 words together. Whatever happens inside the quotes is transferred to the output.
Next, we have the name variable, “Bob”
name = "Bob"
Then we put it together with the ‘print’ command
greeting = "Hello "name = "Bob"print(greeting +name)Output: Hello Bob
Now let’s build this calculator!
Bob makes $20/hour and he works 40 hours a week. So we’ll set those numbers to their own variables and then set a weekly income variable to multiply them.
Bob makes $800 per week. Now we could’ve used the print command to see the answer, but we’re not done yet. We know what the number is though
Bob works 48 weeks per year. So we’ll set that variable. Then we multiply that by the income per week to calculate his yearly income, which will be a variable itself.
Now that his salary’s been calculated, we’re gonna put it all together. We print the ‘name’ variable, and combine that with a string that holds the possessive ‘s’ and “yearly income is”. Then we print the income per year variable.
The hashtags & dashes are comments. This keeps it organized for other programmers who might have to work on this. Imagine if all these commands were stacked on top each other.
And that’s it for my first Python project, even though it’s basic. See yall next time.
USB is a Universal Serial Bus that connects hardware to enhance the use of a software. Most basic example is connecting a mouse & keyboard to a computer to use a word processor, internet, or even a video game.
Hardware like mouse & keyboards are peripheral devices. USBs allow these peripherals to connect to host controllers. In most cases, that’s a PC.
These host controllers have their own types of interfaces, but I’ll get to those later.
To start, there are upstream, and downstream USB connectors. Upstream receives power. Downstream provides power.
This is a charger from some old wireless headphones I used to have. The USB type-A would go into the power source, which makes it upstream because it’s receiving the power. And the MicroUSB would go into the headphones’ case, which makes it downstream because it gives the case power
USB Type-A is the standard square one we’re all used to. It’s the biggest one, so you’ll rarely find it on handheld devices.
Type-A provides 5V of power, as most USB types do.
My laptop charger takes type-C, but it’s connected to a 45W AC adapter. It won’t even recognize a regular type-C like the ones for newer Androids or wireless headphones.
I never knew there was an organization behind USB, the Implementors Forum (USB-IF).
Next I’ll be going through the other USB types. I’d like to understand why we use certain USBs for different devices. As of now, it seems like it’s a physical thing. Like type-Cs are a lot sleeker and they don’t have a right-side up, which is probably why they’re becoming more popular.
Before anything, a database itself, is a set of related information. All the information in a database has a common entity it’s referring to.
The Yellow Pages phonebook is a database. But it has some issues:
It only uses first and last names as its identifier. Even if you have other information on the person you’re looking for, if you don’t have their full name, you’re SOL.
It’s physical, so it can easily be outdated since people move or change their number
This is what’s called a manual data system. Any and all organizations who rely on paper file cabinets have a manual data system. So when computers were first being built, this is one o the first problem they wanted to solve. We all know how messy and unreliable paper files can be.
These computers not only helps us store the data, but retrieves it. When I was in college and I had to buy a textbook, I didn’t prefer to read on a screen, but I loved that I was able to use the ‘find’ feature instead of flipping through pages.
Statements
There are 3 types of SQL statements that serve data structures in their own way (I feel like there may be more, but I’ll trust the book for now)
Schema – define
Data – manipulate
Transaction – begin, end, and roll back transactions (not sure what this means yet)
Query
SQL stands for Structured Query Language. A ‘query’ is, by itself, a question. In SQL terms, this question means that I am seeking information.
Every table (still a dataset) has an entity it’s referring to. Each table is made of rows and columns. A row represents the instances of the entity. Columns represent the common properties of those instances.
So if we made a table of players on a certain basketball team. The rows would be the names of the players, hence why this used for instances, because they’re individual and unique; you won’t see the same player listed twice. The columns would be the properties of those players like height, position, field goal percentage, etc. Every player will have their own space in those properties
The basic statement for a query seems to be the ‘SELECT’ command.
So for the imaginary basketball table, if I wanted to view the full table, I’d do
SELECT * FROM bball
‘bball’ is the table’s name in this case. Anytime I want to retrieve something from this table, I have to end the command with its name
Let’s say I want to view a specific column of this table, say the heights. The position of the asterisk we just used (between SELECT and FROM) was where the command specifies the query. So since i want to look at the heights, I’d just replace the asterisk with ‘height’.
SELECT height FROM bball
This would show me only the height column.
And lastly, if I want to view multiple columns, just separate them with a comma. Viewing height and position while leaving out field goal percentage would look like:
SELECT height, position FROM bball
I know this was pretty scattered. I’m brand new to this. We’ll do some more digging tomorrow.
Like I told yall, I’m stepping away from web development and cracking down on Python. Can’t keep wasting time on languages that have little to do with data science.
FreeCodeCamp’s Python courses are just videos with a multiple-choice question at the end of each one. That’s not going to teach me the language practically. So I’ll keep them as a supplemental resource.
Starting off, the best resource I’ve found is pythonprinciples.com. They have a premium version, but right now they’re letting you get it for free. Just create an account and click ‘upgrade’. So if you’re interested in Python I recommend you get on that now before they start charging again.
Print
First, we use the ‘print’ command. You first type ‘print’, parenthesize your number(s) of choice, then when you run the program, it’ll show that number in the output. ‘Print’ is just the command, it won’t show in the output. And you don’t need a space between ‘print’ and the parentheses. Spaces don’t usually count in programming
We can also use ‘print’ for basic math operations. Just type your equation in with your plus, minus, times or divisor, and it’ll show the answer in the output
print(34*21)
Strings
Next we got strings. A string is how you represent text in Python.
Unlike the numbers, the text has to be wrapped in double quotes.
print("text")
We can also combine (also called ‘concatenating’) the strings which is basically adding 2 texts together to be outputted as one
print("pro" + "gram")
That would output as ‘program’.
Variable
A variable lets you store a value under a name. Just like in algebra when we say x = whatever; x saves us from having to say whatever.
You just type the name you’re using, assign that to a value with the equal sign, then ‘print’ that name.
whatever = 25
print(whatever)
The value you give that name is called a ‘variable assignment’. And the math operations and concatenations can still be used for this too
Just like social media handles, variables can’t contain spaces, so we use underscores.
So again, data engineering is my career goal in tech.
I kinda already did this in my study intro, but that was more data science.
Data science is the more sexy part that you see everybody going for. And I still want to do it, but if I’m gonna do it this way, I got to go all the way. The bare minimum is my enemy on this journey.
Data engineering is unsexy. Science is where you get to ask questions, wrangle data, and generate insights to make better decisions. Engineering is working with the computers that collect, house, and process this data. Playing the video game sounds much more fun than developing it, but I can’t only focus on what’s fun.
So what exactly does a data engineer do?
They develop and maintain scalable data infrastructures while also monitoring the data as it moves through the system.
So just how you develop a video game, you also have to supervise it for any bugs or glitches that come up. It’s not like the old days where they just put out a game and anything that was wrong with it was a you problem. So anything you build, you’re responsible for anything that happens after you build it.
My biggest concern with this whole thing will be collecting the data. The courses and preset projects just give it to you as files, but real-world data isn’t like that. I have to go out in the wild and collect this data, and it’s gonna be messy.
So I got multiple roadmaps I’m looking at. They have dozens of concepts and terms I’ve never seen. So before I let that overwhelm me, I’m gonna focus on Python and SQL, since I can’t even do the easy projects until I’m proficient in those. And I’ll start tinkering with databases; I’ll go through the types of them later. Most of them require SQL so I’ll have to get up on that to unlock that next step
Regarding the math part, I’ve already dabbled in probability, statistics, linear algebra, and calculus. But, just like with school, there’s no point in me zeroing in on those if I’m not ready to apply them. So I’ll be holding off on those until I got use for them.
Most of my work will be on my other sectors, this data sector here is my home base where I’ll be tying everything together.
In chapter 10 of CODE, it starts off with a brief overview of logic, per Aristotle’s theory.
Basic logic is built on syllogisms. This is the standard three-sentence formula for how we arrive at the truth of a matter.
There is a major premise, a minor one, and a conclusion.
The most common one you’ve probably seen is,
All men are mortal
Socrates is a man
Therefore, Socrates is mortal.
Many mathematicians have attempted to understand logic using all the numbers and symbols at their disposal.
That all changed with George Boole, who you may recognize from the boolean operators in algebra.
A self-taught man from a poor background, Boole inserted himself into academia by publishing a series of papers that were lauded by the local institutions of the time. He observed that if humans use logic in the same manner that we use math, then we can use math to better understand the mind; ultimately make better decisions. That hypothesis is a little reductive, but I see the idea he was aiming for.
Boolean algebra is the arithmetical form of logic that we’re used to.
Examplestraight from the book: Anya has 3 pounds of tofu, Betty has twice as much tofu as Anya, Carmen has 5 pounds more tofu than Betty, and Deirdre has triple the amount of tofu that Carmen has. So how much tofu does Deirdre have?
Now it shouldn’t be hard to do this in our heads, but that isn’t going to get us far.
I remember back in middle school, there was a math class assignment I had to do. So I did it, I got the right answer….. yet the teacher told me I was wrong.
So I started to argue with him, “How is it wrong if I got the right answer?”. He didn’t have any other response besides, “It is not the right way”.
Of course I started to get irritated. I kept asking him the same thing, “HOW IS IT WRONG IF I GOT THE RIGHT ANSWER?”, and of course he kept with his simple-minded response. So in the end, I got the problem wrong.
What I did wrong was doing it all in my head; I didn’t show my work.
Now that I’m older (or just learning to actually use and not just pass), I can see why this was wrong, even though I still resent that teacher for not doing his job and teaching me wtf I was doing wrong, but I digress.
See, doing math in our head is only good for simple algebra, like our tofu problem, but when it comes to dealing with multiple variables and decimals, that method falls apart quick.
This is one of those situations where both sides were right and wrong in their own way, but I will continue to hold that grudge against the teacher since he was the supposed superior who failed to live up to his duty.
So on one side, the teacher was wrong for refusing to explain why we need to show our work. On the other side, I was wrong for thinking I can get by doing all algebra in my head.
As someone who aspires to work in science, I do see why it’s necessary to show our work, but the teacher shouldn’t have made me out to be wrong even though I got the correct answer.
Apparently it was the worst thing in the world for him to simply explain, “Look, you did get this problem right, but you can’t rely on doing it in your head. Algebra in the real world requires you to show your work, and you can’t do that if you don’t write anything down. So again, you did get this problem right, and it is good that you can do it in your head, that will come in handy in life, but you have to focus on showing your work too.”
But nah, we can’t expect our ‘qualified’ educators to articulate themselves that well.
Anyway, enough reminiscing. Back to our tofu problem.
You might’ve noticed the names in the problem are our first four letters, (A)nya, (B)etty, (C)armen, (D)eirdre, which will make our translation to arithmetic smoother.
A = 3
B = 2 x A
C= B+5
D = 3 x C
So our ultimate goal in arithmetic is to simplify our equations; we want to get them into as few numbers as possible while keeping all the variables present.
D = 3 x C
D = 3 x (B+5)
D = 3 x ((2 x A)+5)
D = 3 x ((2 x 3) + 5)
D = 33
Properties of Numbers
Adding and multiplicationare commutative; the answer is the same regardless of their order.
A+B=B+A | A x B=B x A
By contrast, this means that subtraction and division are not commutative, since their order is relevant.
We also have associative. If we have A+B+C, the equation will essentially be the same as A+(B+C) or (A+B)+C.
Multiplication is distributive over addition. I always found this one to be the easiest. It’s just when we multiply the separate numbers by each individual number in the parentheses.
A x (B+C)=(A x B)+(A x C)
Boole’s Way
Our man Boole was able to detach algebraic expressions from strict numbers. We typically call them variables, but they are actually classes. Classes are nested within sets.
The book uses the example of cats, so let’s establish the sets and classes of cats.
First we got male (M), and female (F); like there’d be anything else. For colors, we got tan (T), black (B), white (W), and other (O). And just to add one more set, we got neutered (N) and unneutered (U).
Now with numbers, we’re used to seeing addition as combining addends. In this abstract Boolean algebra, + means a union (∪) of classes. While x means an intersection (∩) of classes.
So B+W (or B∪N) would represent the class of all cats that are either black or white.
As for multiplication, and there’s a slight nuance in this, B x W(or B∩W) would represent the cats that are both black and white.
So unions are either-or, and intersections are both or all.
Boolean algebra uses 1 to mean all, and 0 as none.
The class of all cats would be: M+F=1 | B+W+T+O=1 | N+U=1
We can also use it to exclude: 1-M=F (All cats except males; only females)
0 in this context would be M x F= 0, since there are no both male-female cats
F+(1-F)= 1(All female cats – all cats except females = all cats)
F x (1-F) = 0(All female cats x all cats except females = no cats)
To go back to the syllogism, “All persons are mortal (M). Socrates (S) is a person (P).”
P x M = P (Persons x Mortal = ALL persons)
We couldn’t do P x M = M because that implies that only persons are mortal; it doesn’t account for animals and plants
So we know that Socrates is a person, meaning S x P = S
Now let’s put this together
S x (P x M) = S
By associative law, this is the same as (S x P) x M= S
But since we know that S x P = S (and we know that persons are mortal), we’ll just simplify it with
S x M = S
If he wasn’t mortal, it’d beS x M= 0
We couldn’t do S x M = Mbecause, like for persons, Socrates is not the only mortal being in existence.
So we use Boolean algebra as a model for worldly logic. Every decision we make is arrived at by applying logic to set criteria.
Remember that a union (∪ or +) means OR, an intersection (∩ or x) means AND, and 1- means NOT
Here’s a more practical example:
I walk into a pet store, and tell the salesperson,
“I want a male cat, neutered, either white or tan
OR a female cat, neutered, any color but white
OR I’ll take any cat as long as it’s black”.
That request in Boolean algebra would look like:
(M x N x (W + T)) + (F x N x (1 – W)) + B
In word form, this looks like:
(M AND N AND (W OR T)) OR (F AND N AND (NOT W)) OR B
Mind you, this is not another way of writing down the request like we just did. This binary form is used to test the request.
So to bring the expression back down:
(M x N x (W + T)) + (F x N x (1-W)) + B
Let’s say the salesperson first brings out an unneutered tan male. Applying that to the Boolean test would be:
(1 x 0 x (0 + 1)) + (0 x 0 x (1 – 0)) + 0
The only 1’s in this expression are ‘male’ and ‘tan’ since those were the only met criteria. Since this cat is unneutered, it does not meet the criteria, therefore it is not a valid option for me (the buyer).
In line with regular math, only 1 x 1 = 1; all parts must be satisfied before the criteria is fully met. A 0 anywhere in that equation would invalidate it, since it represents a part of the criteria that was not met.
Although, 0 can be present in any OR (union) expressions since it doesn’t mean it has to be a part, it only can be; has the potential to be, though not currently is.
If I ask for either a red OR blue ball, and you bring me one red and one green, my criteria was still satisfied, because I don’t have to take the green one. I already have an option that suffices (the red ball).
1 + 0 = 1 | 0 + 1 = 1
Circuitry
To close out the chapter, let’s apply Boole’s way to the makeshift lightbulb circuit we did a while ago.
To refresh, a circuit is made of a lightbulb connected to a battery through a switch. For this example, we’ll use 2 switches in series; meaning they must both be closed for the current to travel.
So since both switches in series must be closed to light the bulb, that makes this an AND (x or ∩) situation.
On the other hand, we can arrange the switches parallel to each other (one above the other as compared to right next to each other). That arrangement is an OR (+ or ∪) situation.
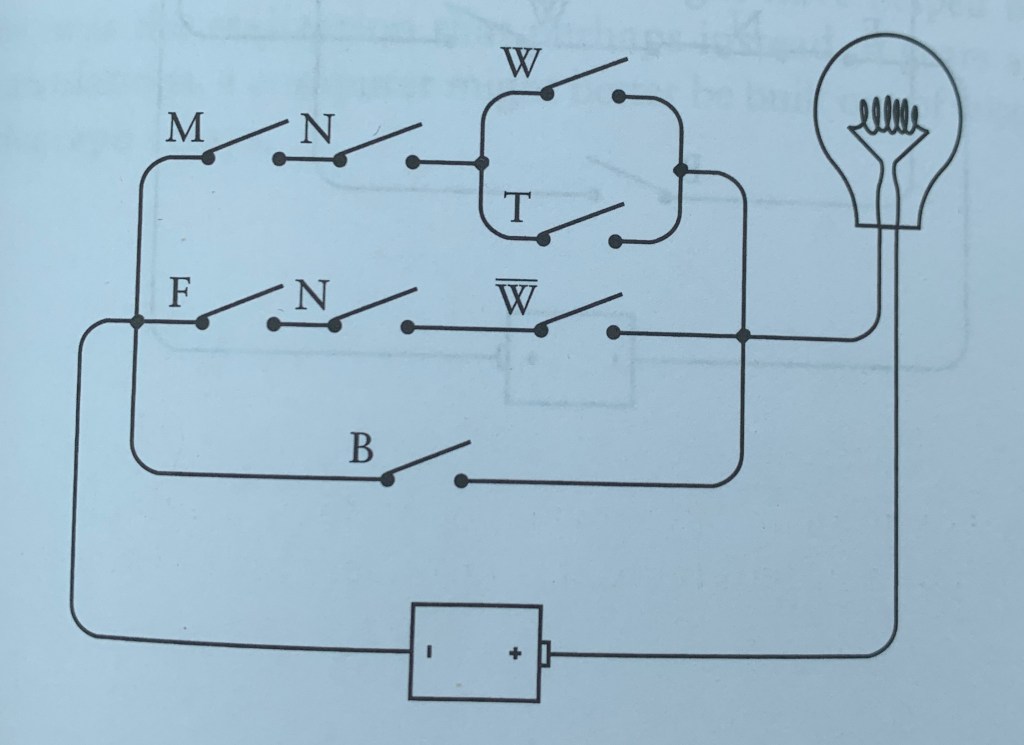
I’m not doing a complete elaboration on it, but here’s a diagram of a circuit with our cat-shopping situation applied to it. It shouldn’t be hard for you to translate it from the expression to see what’s needed to light the bulb (buy the right cat).
Chapter 11
Relating to the diagram we just looked over, a circuit has a series of logic gates. They serve the same exact function as an actual gate, to restrict access to anything and to allow it for certain things.
An inverter, simply put ensures that when one gate is opened, the other is closed. If male and female are in series with one switch, without the inverter, both would be lit, which is impossible. I’m not entirely confident in this explanation. I’ll cross my fingers that it’ll make more sense later.
4 AND gates with 2 inverters is a ‘2-Line-to-4-Line Decoder.’ There’s also a 3 to 8, a 4 to 16, and so forth. We’ll come back to this in a later post.
Putting it Altogether
Rd yall, if we can get past this, the rest of the book should be a breeze. Let’s just take it step by step.
Since this is using an electrical circuit as the model, I’ll take us through this by tracking how our logical current(LC) makes it way through the circuit.
The inverter symbol is the triangle with the dot; next to the second W
The flat plug represents AND
The curved plug represents OR
The wires going in the plugs from the left are the inputs, and those coming out on the right are outputs
So let’s bring our expression down again
(M x N x (W + T)) + (F x N x (1-W)) + B
Let’s get the easy one out the way first: anything as long as it’s black.
We see the B (at the bottom) only goes through the last OR plug, who shares a wire with N. This makes sense because if the cat isn’t black, the only other absolute requirement is that the cat is neutered.
Now just behind the last OR plug, we see the AND plug, but let’s put that to the side for now and look at the OR plug behind that.
This OR plug (the one smack in the middle) is for ‘male’ or ‘female’. So we know that as long as one of those are satisfied, it can move onto the last AND plug.
Take it from the beginning now, from top to bottom. Say the salesperson brought out a neutered female, any color but white (F x N x (1-W)):
We know it’s neutered, so N’s LC will go through
It’s notmale, white, or tan, so we disregard those; no LC
We know it’s female, so F’s LC is good
Now this second W below the F has an inverter, which reverses the LC. It’s best if we just look at the inverter as if it’s on a chronic opposite day; whatever function is next to it, choose the opposite of it. So as long as the cat is any color but white, that triggers this second W’s LC.
Since this cat fits what we’re looking for, this bulb is lit (kitty has a new home!)!
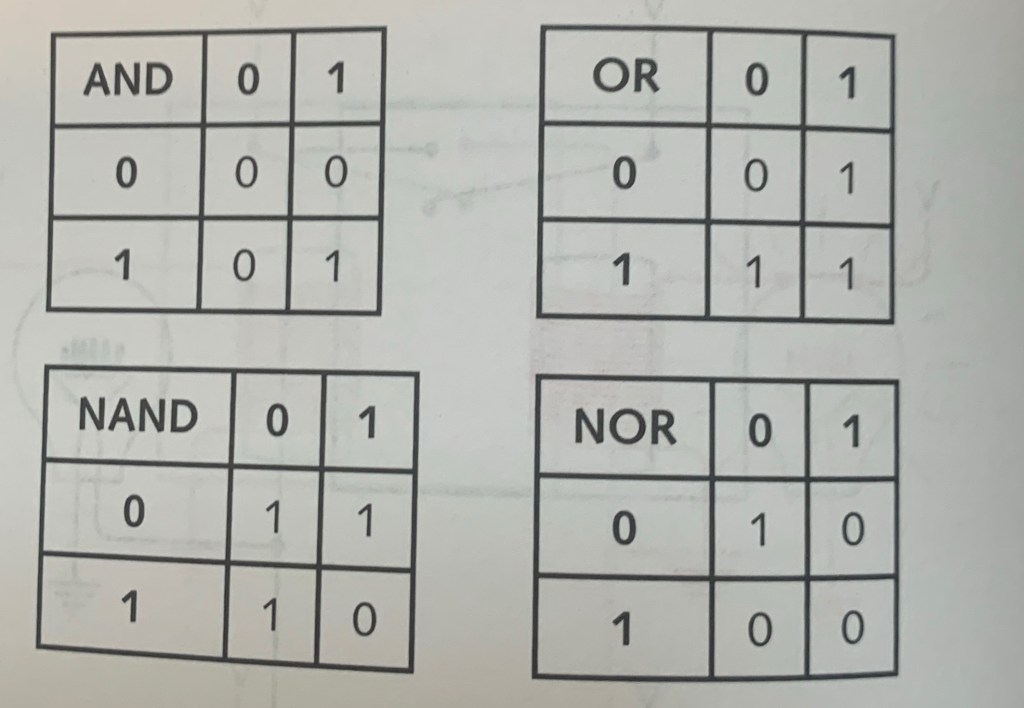
The NANDS NOR the AND OR NOTS
Similar to the inverters, AND and OR have their own antitheses, NAND and NOR.
AND = only both | OR = either one, but never none | NAND = anything but both | NOR = none
NOR looks redundant, like boneless watermelon. I get the concept, I just don’t see the full purpose of these yet.
I skipped over a lot in this chapter, I just wanted to put the symbols on paper so we can get ready to push through the rest of this book. The next chapter goes deeper into binaries, but we surely will be seeing more of these circuits soon.
The first project is a tribute page. My finished product should be functionally similar to this sample.
FCC lets you make the page about whatever you want it to be, so I’ll be dedicating this one to the late-great Sidney Poitier. The best thing about this is it lets me do leisure research while tying it into a practical task.
I first want to say how I admire CodePen’s interface. It has 3 different interpreters (HTML, CSS, JavaScript) and lets you see a preview of your work right below. It looks much simpler than the other ones I was trying like Atom or GitHub. I’m sure those two are sufficient, but CodePen is less overwhelming for a beginner. Though I am wondering if this is realistic, I would think real-world code (in professional settings) is all put together and not separated like this.
I do hope this project doesn’t expect me to do any JS; like those teachers who put material on the test that we never went over.
Anyway, let’s get to it.
There are 9 ‘user stories’, which is essentially the criteria this webpage must meet. They’re not really that difficult, nor am I going to walk through every last one, so you can just look over them here.
Now I could just copy and paste the sample’s code and replace the content with mine, but that wouldn’t do anything for me in the long run. So I will use the sample as a reference, but I’ll make sure to type out every command from scratch.
Here’s how the page looked after only using HTML:
And here’s the code. Notice the white text is what’s physically on the page:
So turns out you don’t actually have to add any stylistic properties to this page. After you finish the HTML, all they ask is to make the image responsive.
All I had to do was add the image and image container (img-div) properties to CSS. The former adjusts the content itself, while the latter adjusts the box the content lies in; the product and the package.
I didn’t feel like making this unnecessarily harder, but out of respect for Mr. Poitier, I styled the colors after the Bahamian flag. You can Google any special color along with “CSS code” or “RGB code” if you want to be fancy.
Anyway, here’s the CSS code:
And here’s the final product:
This wasn’t as hard as I anticipated, just tedious. I know this is only the beginning.
But for today, I’m patting myself on the back. I made my first webpage from scratch. 😆
I’m even more lost doing this than I was with flexbox. So I’m just gonna breeze through this and learn how it applies when it comes time for the project. I’ll still show you the right answers, but take the explanations with a grain of salt; I’m still learning just like you are.
display: grid;
This allows us to use all properties associated with CSS Grid.
Then we define the structure of the grid; we’ll start with grid-template-columns.
grid-template-columns: 100px 100px 100px
Each unit (we have 3 here) you add is the amount of columns that the grid will entail
The same goes for grid-template-rows.
The values for these row/column templates are, fr (fraction of the remaining row/column; can be any whole number), auto (automatically adjusts to the width/height of the grid), and % (adjusts column/row to the percent width of its container).
You can create a gap between columns with the grid-column-gap. The value is any unit of px.
And once again, the same goes for grid-row-gap.
We also can do an abbreviation of this with grid-gap. You’d only use this if you want to space all the rows/columns. If you put 2 values, it will adjust the rows and columns, in that order.
Using the grid-column element, we can use a fractioned value to make an item extend. So for this task, I used 2/4 to make the item extend from column 2 to column 4. grid-row applies too.
Next we can align an item horizontally (justify-self) and vertically (align-self). The 3 values are: start (left/top), center (middle), and end (right/bottom).
You can also align all items as compared to single ones like we just did. Just replace ‘self’ with ‘items’. The same 3 values still apply.
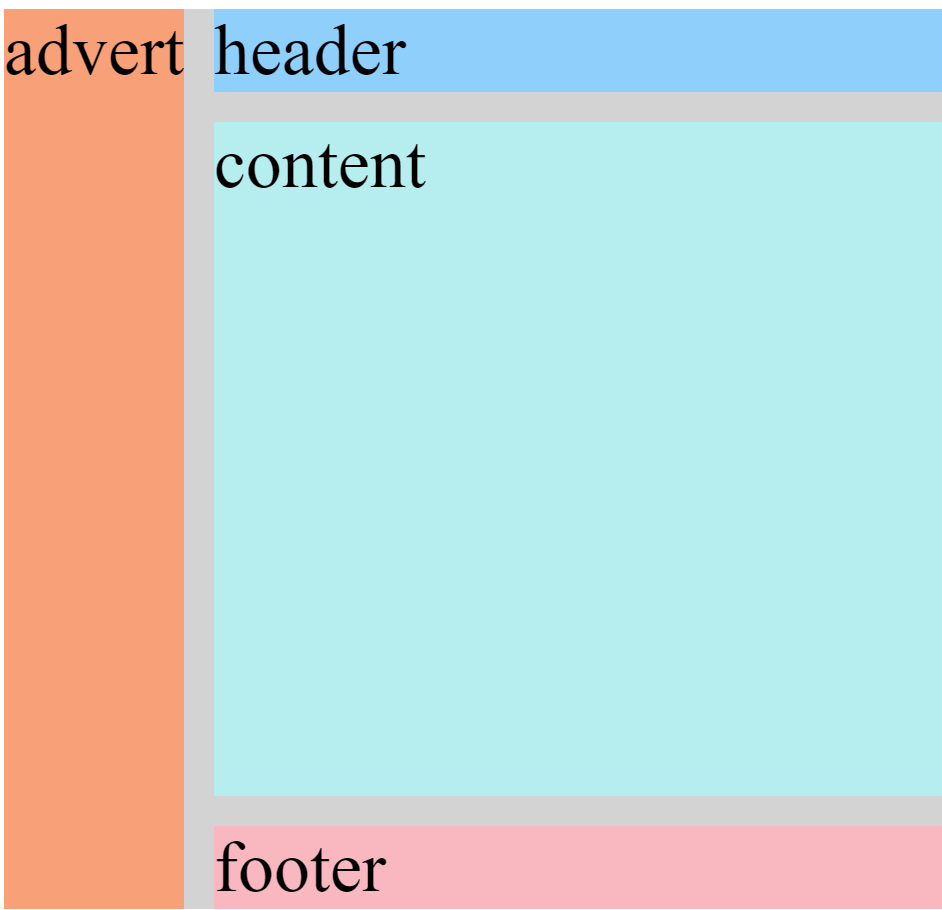
Creating an area template for our grid basically allows us to play with it a little more manually, as compared to doing separate commands for every little thing.
Based on a 3×3 grid, each of these values represents a box within the grid. So the “header header header” represents the top 3 boxes, “advert” is the middle row’s left while “content content” is the middle row’s middle and right boxes, and “footer footer footer” encapsulates the entire bottom row.
Under whichever class you choose, you can use grid-area to reposition the item into any value. Going off of the above code, if I set the value to footer, the class’s item would then take up the whole bottom row.
In the event there is no area template available, we can use the line numbers alternative:
grid area: A/B/C/D
A: horizontal start point/B: vertical start point/C: horizontal end point/D: vertical end point
So if you wanted the item to start from row 1 and end at row 2, and also start from column 3 and end at column 4, you would write it as 1/3/2/4
This whole time we’ve been adjusting a 3×3grid, as we go on, we’ll see the grids in the real world are way bigger than that. As compared to the grid-templates where we write a unit for each row/column, we can use the repeat function to select multiple rows/columns instead of writing in the unit for each one. This only works if you want the unit to be equal between all selections; it doesn’t work if you want 22px for one and 54px for another.
grid-template-columns: 2fr 2fr 2fr 2fr;

to

grid-template columns: repeat(4, 2fr);
This keeps our code clean from a bunch of redundant units.
To limit items’ sizes when the containerchangessize
grid-template-columns: repeat(3, 1fr);


to

grid-template-columns: repeat(3, minmax(90px, 1fr));
The units in the ‘minmax’ function are the specified minimum and maximum widths of the column.
Still barely know what I’m doing, we’re almost done.
Adding auto-fill to a repeat function (supposedly) adjusts the items to fit the container to leave space for newer items
Auto-fit on the other hand seems like it only adjusts the items’ sizes to fit the container itself; so I guess this is for when you don’t plan on adding any more.
FINALLY, we can create a grid within a grid. Under your selected class, you first add the display grid property (the first code in this post) and then use either of the templates we went over.
What I Learned Today
To first define a grid to be able to adjust it
Define the structure of grid rows/columns (values: fr, auto, %)
Create a gap between rows/columns
Extend a grid item using a fractioned value
Align an item horizontally/vertically
Align all items horizontally/vertically
Create a grid area template
Reposition an item in a grid area
Use line numbers as an alternative for an absent grid template
Use the ‘repeat’ function to avoid writing the same unit over & over again
Limit items’ sizes for when the container changes size with ‘minmax’ function
Use ‘auto-fit’ and ‘auto-fill’ to adjust items’ size within the container
Create a grid within a grid
Concerns
For #7: When assigning a value to the grid area, why does only one take up the whole row? Why is it when I only put one ‘footer’, it doesn’t do one box if the template area has 3? Shouldn’t it be like ‘footer footer footer’ if I want the whole row?
Finally done the basics! I’m almost certain that these grids are just a way of manually adjusting site content; basically the technical way of putting together a site compared to drag-and-drop.
Next up I’ll be doing the first project, a tribute page.