Past learning the basics of Python l wasn’t sure what to apply it to. The best way to learn is by doing, but I don’t feel like making a weather app or a calculator. Anything I do want to make is above my skill level. So as a next step, I’m gonna dabble in game development. I’m starting with the most basic arcade game there is, Pong. Geeksforgeeks.com has the entire code that actually functions on its run. I pasted it to the bottom of this post. I’ll be analyzing each line to understand its purpose

The first thing I learned with this is using libraries with Python. A library is a toolbox that can be used for a variety of operations. Each library has its own set of methods for its niche. A few examples are NumPy which is used for advanced math like calculus or statistics, or Matplotlib which is used for data visualizations, like charts and graphs. For this, I’ll be using the Pygame library whose name speaks for itself.
If you want to do this yourself, you gotta do 3 things, and this can only be done on a computer.
- Download the Python language from python.org
- Download Pygame from pygame.org
- Open the IDLE (Integrated Development and Learning Environment) that comes with the Python language. This is the word doc of programming. There are other ones with more capabilities, but this is the most basic one that’ll get the job done.
Once you got those done, if you paste the full code and run it, the game should be functional.
Remember any sentence with a hash (#) in front of it is a comment. These are used to label the blocks of code. They’re not code themselves.
Also notice that every function, except for the ‘init’ at the beginning and the ‘main’ one at the end, has ‘self’ as its first argument. Keep that in mind.
First things first, we have to import the Pygame library.
import pygameWe use an initialize function to launch it.
pygame.init()Next, we set the text font for the player names that’ll show up top. 20 is the font size. ‘freesandbold’ is a font style by Pygame. It’s not technically imported, but it’s not a regular system font. That’s why we put the capital F ‘Font’ class right after ‘pygame.font’. If we wanted to use a system font like Arial, we would use the ‘SysFont’ class.
font20 = pygame.font.Font('freesansbold.ttf', 20)Next block speaks for itself. We’re setting the colors that’ll be in the game. Using RGB values.
BLACK = (0, 0, 0)
WHITE = (255, 255, 255)
GREEN = (0, 255, 00)
Next we set the display dimensions, width and height. Then we set a ‘screen’ variable to display the window surface. I tried setting this to fill my computer’s resolution, but it was so big you couldn’t see the paddles. Even cutting the dimensions in half was still too much. With this 900×600, it shows as a fixed window that you can’t maximize. ‘pygame.display.set_mode’ is a built-in function that’s vital for creating this display. The ‘set_caption’ line under it is where we name the program that’ll show as the window name.
WIDTH, HEIGHT = 900, 600
screen = pygame.display.set_mode((WIDTH, HEIGHT))
pygame.display.set_caption("Pong")
Lastly for the general setup, even though the end of the function says ‘Clock’, this actually sets up the frame rate of the game. ‘FPS’ is a custom variable, just how the first ‘clock’ is. This means those names do nothing for the actual function, you could call them ‘googoo & gaga’ if you wanted to. We just use them to be descriptive and use common sense. After you call the ‘Clock’ function, it knows that any variable you set to a number after that will be the frame rate. This is another one of those built-in functions of Pygame.
clock = pygame.time.Clock()
FPS = 30
Paddles
The ‘Striker’ class represents the paddles in the game. All of these blocks with ‘def’ are a series of functions we’re using to control the paddles’ behavior. The first one is a constructor that initializes the paddles’ position.
class Striker:
		# Take the initial position, dimensions, speed and color of the object
	def __init__(self, posx, posy, width, height, speed, color):
		self.posx = posx
		self.posy = posy
		self.width = width
		self.height = height
		self.speed = speed
		self.color = color
The use of ‘self’ looks redundant, but here’s why it’s not. It’s conventionally set as the first argument, even though it’s not technically one. We see the arguments after ‘self’ are the attributes of the paddles. The paddles, ‘geek1 & geek2’, are defined in the ‘main’ class further down. And when they’re defined, we see the arguments in those are set to the attributes. So why can’t we just use the initialization function with those attribute arguments and define the strikers right under it like this?
def __init__(posx, posy, width, height, speed, color):
    geek1 = Striker(20, 0, 10, 100, 10, GREEN)
    geek2 = Striker(WIDTH-30, 0, 10, 100, 10, GREEN)
This wouldn’t run. Without ‘self’, the attributes would be stuck within the class as local variables, making them unable to branch out to other instances, which are the paddles in this case. Put simply, for the attributes to actually be applied, they need a ‘self’ reference so the system knows to apply it to the instance we’re working with. It’s another one of those anal computer tidbits.
‘Posx & y’ are the positions of the paddles using basic coordinates. ‘Width ‘and ‘height’ are the dimensions of the paddle. ‘Speed’ is how fast the paddles move when the control key is pressed. And color speaks for itself. Again, these are the arguments for the ‘initialize’ function.
After listing the regular arguments. The ‘.geekRect’ after ‘self’ is just a variable name. ‘pygame.Rect’ is a class that deals with rectangles in the game. The arguments in that function with the positions and dimensions are directed to the rectangle.
self.geekRect = pygame.Rect(posx, posy, width, height)Below that is ‘pygame.draw.rect’. This apparently draws the rectangle, but they still show even if I delete this line. We’ll see why it matters in the next line. And again, this was all under the initialize function. Now that it’s laid out, we start making them work.
self.geek = pygame.draw.rect(screen, self.color, self.geekRect)The next standalone method displays the rectangle using the same ‘draw’ line we just went over. Without this line, nothing shows up, but it still works if I delete the first ‘draw.rect’ line. So we may be able to call that one redundant since the game runs the same with or without it.
def display(self):
	self.geek = pygame.draw.rect(screen, self.color, self.geekRect)
The ‘update’ method contains a ‘yFac’ argument which is for its factor on the y-axis. As we know the paddles can only move up & down, but we also can’t let them slide out of the display. This function is the start of setting those boundaries so they can only go to the top or bottom of the screen.
def update(self, yFac):
	self.posy = self.posy + self.speed*yFac
Unlike the coordinate grids we use in math, negative y-numbers are higher, and positive are lower. Coordinate (0,0) is the top-left corner of the screen. So to stop the paddle from going above the screen, we set a conditional so if y’s position is less than or equal to 0, it’ll restrict the paddle to y-0 and nothing lower.
if self.posy <= 0:
	self.posy = 0
To keep it from passing the bottom, we have to consider the paddle’s height. When passing above the screen, the head of the rectangle is its leading point. When passing the bottom, it goes foot-first. Again, since y-values go up as the space goes lower, the rectangle’s height was generated from the top-down. So the very bottom of the paddle is where it’s 100 pixels. We didn’t do this for this top boundary since the paddle’s head has nothing to it. Its length works down.
elif self.posy + self.height >= HEIGHT:
	self.posy = HEIGHT-self.height
The height of the screen (600) minus the rectangle’s height (100). So ‘posy: 500’ represents the zone the paddle is not allowed to move past.
I’m not sure what this next ‘self.geekRect’ function does. The comment says it updates the geekRect with new values, but if I delete it, the paddles won’t move despite pressing the keys. This is the one line I’m uncertain about. I don’t know why we’re referencing the rectangle again, but I know the game doesn’t function without it, so it is necessary. I want to see how this works for other games down the line.
self.geekRect = (self.posx, self.posy, self.width, self.height)The next function is described in its name, it displays the score. It starts with a ‘text’ variable set to a ‘font.render’ method. The first argument in this method concatenates ‘text’ which will be the player’s name, and ‘score’ is set as a string. Even though score is a number, it has to stay a string for rendering purposes. And remember, a string can contain numbers too. The ‘True’ pertains to aliasing, which is a feature where the text is deblured to look sharper. If it was set to ‘False’ it would disable the feature.
def displayScore(self, text, score, x, y, color):
	text = font20.render(text+str(score), True, color)
	textRect = text.get_rect()
	textRect.center = (x, y)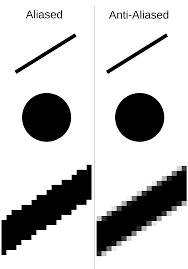
The fact the system inherently knows ‘True/False’ to pertain to that is a convention. Just as you see here, it’s typical for the antialiasing argument to be second in the ‘font.render’ method.
And of course, the color is set as an argument to initialize it.
The ‘textRect’ variable creates a function that creates the rectangle that surrounds the text. Like a text box.
And the last line with the ‘.center’ attribute is what centers the text within that rectangle. The ‘x & y’ just specify it should be a position on the box. Seems redundant, but the game doesn’t run if it’s not there.
For the ‘screen.blit’ line, blit means to place one surface onto another, which is the text onto the screen in this case. ‘text’ is the text itself, and ‘textRect’ is the text box we created. So we’re technically placing 2 things onto the screen. One concern I had for this was why is the text being put under the Striker class and not the main class? The main reason is that the paddles have their own scores they have to manage. So it makes more sense to keep that method with this class for organization.
screen.blit(text, textRect)And lastly the ‘return’ statement allows ‘geekRect’ to be called, but not modified from the outside. A pattern I’ve noticed is you have to establish a thing, give it the right to be modified, then give it the right to be called.
def getRect(self):
	return self.geekRect
Ball
Now onto the ball. Just how we did with the striker class, we set all the ‘self’ statements to initialize the characteristics of the ball. The one new one is the radius of the ball since it’s a circle. The x and y-factors are here for the initial motion of the ball. Since the first player starts on the left, the ball will travel right (hence xFac 1) and up (hence yFac -1). Again, this is for the first serve of the game. After that, we use the ‘draw’ feature to create the ball. Since the ball moves on its own, the ‘firstTime’ attribute set to 1 tells the system it hasn’t crossed a boundary yet. Once it crosses one of those bounds, ‘firstTime’ is set to 0, to which it then resets to 1 putting the ball back in the center. If we set it to 0 by default, the ball would fly past the boundary indefinitely and never respawn or count for a point. The ‘firstTime’ attribute isn’t the literal first time. It just manages the ball so it behaves the same way on every serve. The game is technically over once it crosses a bound, so we have to keep it on a loop.
class Ball:
	def __init__(self, posx, posy, radius, speed, color):
		self.posx = posx
		self.posy = posy
		self.radius = radius
		self.speed = speed
		self.color = color
		self.xFac = 1
		self.yFac = -1
		self.ball = pygame.draw.circle(
			screen, self.color, (self.posx, self.posy), self.radius)
		self.firstTime = 1
The next is a ‘display’ function like we did for the paddles. We call all the superficial properties of the ball as arguments. Also notice that posx and y are grouped as a tuple. This is a syntax standard for coordinates since it makes no sense to only display one.
def display(self):
	self.ball = pygame.draw.circle(
		screen, self.color, (self.posx, self.posy), self.radius)
The ‘update’ function modifies the ball’s position based on its speed and direction factors. The ‘self.posx’ and ‘self.posy’ variables are adjusted by adding the product of the speed and the respective axis factor. For instance, suppose the initial y-position is 100, and the ball maintains a constant speed of 5, with an initial y-factor of -1 (indicating an upward direction). When the ball hits the top boundary and changes direction (due to the y-factor of -1), the new y-position is calculated as follows: 100 + (5 * (-1)), resulting in a new y-position of 95. The same process applies to the x-position.
def update(self):
	self.posx += self.speed*self.xFac
	self.posy += self.speed*self.yFac
If we made the y-factor 1, the ball would travel well past the top boundary and respawn in a perpetual upward direction.

Now we set the boundaries of the game area so the ball knows to bounce off the walls. This is where conditionals come in. The first ‘self.posy’ is set to less than or equal to 0. Remember y0 is the top of the screen. As to why we have to include equal to 0, I’m uncertain. Supposedly, leaving it out will make the ball partially clip out of bounds, but it does that even with the equal sign. Regardless, by setting the less-than sign, the ball knows it has no business anywhere under y0.
if self.posy <= 0 or self.posy >= HEIGHT:
	self.yFac *= -1
The second ‘self.posy’ is for the bottom of the screen. We set the ball’s y-position to be greater than or equal to the height of the display.
If it was just greater than (>) it would be the same.
If it was just equal (==) to the height, the ball will start off moving up, then once it passes the bottom, it waits to pass the player’s goal before respawning in a downward direction. It never reaches the paddles after that.
If it was less than (<), with or without the equal, the ball travels horizontally in a squiggle. Why is this? The correct version is greater than because when the ball passes the bottom, its y-position is greater than 600, to which it knows to respawn at that point. When we set it to less than the height (600), we’re telling the ball from its initial spawn point that it’s at the bottom. The whole display is less than 600. This restricts the ball’s y-position since we took away any room it had to move on that axis.
At last, the ‘self.yFac’ statement ensures the y-position is always multiplied by -1. This means when the ball hits the top, since that’s going towards the negative, the -1 will revert that to positive 1, which makes the ball travel downward. And when the ball hits the bottom, who’s positive, it keeps the -1 which makes the ball travel upward. Simply put, this is what makes the ball change its vertical direction when it hits the floor or ceiling.
Next we do this with the x-coordinates, the ball’s horizontal movement. The key difference here is the ball doesn’t bounce off the sides. The entire space behind a paddle is a goal. So we start the ‘self.posx’ the same as we did with y. First set it to less than or equal to 0. x0 is the very left of the screen, any more left is negative. So when the ball crosses into that x-negative, the ‘self.firstTime’ flag is what’ll count that movement as a point. The ‘return 1’ adds a point to the right paddle, since the ball went out the left bounds.
if self.posx <= 0 and self.firstTime:
	self.firstTime = 0
		return 1
This elif (else-if, used when the first ‘if’ doesn’t work) manages the left paddle’s score. The ‘self.posx’ is set to be greater than or equal to the width of the game window. Since x-positive is to the right, and the game window’s width is 900, when the ball’s x-position is at and trying to pass 900, the system knows to give the left paddle a point.
elif self.posx >= WIDTH and self.firstTime:
	self.firstTime = 0
		return -1
‘self.firstTime’ keeps these scores as a singular instance. Otherwise the score would rapidly climb after only one goal. The ‘return -1’ has to be negative. If it were positive, the right paddle would get a point even if it was scored on.
And the ‘else return 0’ is the default ‘no score’ if no goal has been made.
else:
	return 0
The ‘reset’ function manages what happens to the ball after a score. ‘self.posx & y’ makes the ball restart at half the screen’s width and half its height, which is the direct center of the display. The ‘-1 xFac’ makes the ball shift the opposite direction of whatever it just scored. If it went out to the left, it restarts being served to the right. We then set the ‘firstTime’ to 1 so it knows to execute this function the next time the ball goes out.
def reset(self):
	self.posx = WIDTH//2
	self.posy = HEIGHT//2
	self.xFac *= -1
	self.firstTime = 1
This next ‘hit’ method makes the ball reflect off anything it hits horizontally, which will be strictly the paddles. The ‘xFac’ is -1 so that if the ball collides with the left paddle, which is a negative-x, it reverts to positive 1 so it bounces to the right. If hits the right paddle, which is positive-x, it’s again inverted by -1, so it bounces to the negative direction left.
def hit(self):
	self.xFac *= -1
The last code of this class is for creating a rectangle around the ball that’ll be used for collision detection.
def getRect(self):
	return self.ball
Game Manager
Now that the objects are created, we can finally set the game’s logic.
The ‘True’ assigned ‘running’ variable under the ‘main’ function is what makes the game run indefinitely. If it was set to ‘False’, the game wouldn’t start at all.
def main():
	running = True
These next 2 ‘geek’ lines are where we illustrate the paddles. The set of 5 numbers represents posx, posy, width, height, speed, and of course the color is written at the end. So the ‘geek1’ paddle (the left one) is 20 pixels from the left of the screen, it starts at y0 which is the very top of the screen, it has a width of 10, a height of 100, a speed of 10, and it’s green.
geek1 = Striker(20, 0, 10, 100, 10, GREEN)The right paddle ‘geek2’s ‘posx’ is set to be 30 pixels away from the width of the screen. Again, the far left is x0, so the far right is x900, since we set the screen’s width to be 900. So since it’s 30 pixels away from 900, we could technically just set geek2’s posx to be 870, but either way works.
Also you might notice that geek2 is 10 extra pixels away from the right edge as geek1 is from the left. This is just one of those visual balance things where an anomaly looks better than numerical equals. The first pic is with the extra 10. The second is without it.


geek2 = Striker(WIDTH-30, 0, 10, 100, 10, GREEN)Next we do the same with defining the ‘ball’ variable. The width and height divided by 2 tell the ball to start at the direct center of the screen. The first 7 is the ball’s radius and the second 7 is its speed. Then we close it out making the ball white.
ball = Ball(WIDTH//2, HEIGHT//2, 7, 7, WHITE)The ‘listofGeeks’ variable after that is meant to store the references for the paddles.
listOfGeeks = [geek1, geek2]The next 2 lines control the parameters of the players’ scores and their y-factor which only allows the paddles to move up and down.
geek1Score, geek2Score = 0, 0
geek1YFac, geek2YFac = 0, 0
Now we’re moving on to the main loop of the game.
‘screen.fill’ makes the screen black.
while running:
	screen.fill(BLACK)
The ‘event handling’ block manages the events only a player can make. Which is either quitting the game or moving the paddles. The block starts with a ‘for’ loop which will iterate all the events from the ‘pygame.event.get’ function.
for event in pygame.event.get():
	if event.type == pygame.QUIT:
		running = False
	if event.type == pygame.KEYDOWN:
			if event.key == pygame.K_UP:
				geek2YFac = -1
			if event.key == pygame.K_DOWN:
				geek2YFac = 1
			if event.key == pygame.K_w:
				geek1YFac = -1
			if event.key == pygame.K_s:
				geek1YFac = 1
			if event.type == pygame.KEYUP:
				if event.key == pygame.K_UP or event.key == pygame.K_DOWN:
					geek2YFac = 0
				if event.key == pygame.K_w or event.key == pygame.K_s:
					geek1YFac = 0
The first indent is a condition that checks if the current event is a ‘QUIT’ event. If it is, the ‘running’ variable is set to ‘False’ which stops the game from running.
Everything after this pertains to the controls. I first want to point out the ‘KEYDOWN’ is when a key is pressed, and the ‘KEYUP’ is when it’s released. Let’s start with KEYDOWN.
So we see that all the keys really do is affect the paddles’ y-factor. ‘W & S’ are the left paddle’s controls and the ‘up & down’ arrows are the right’s. So when ‘W’ or the ‘up’ arrow is pressed, that respective paddle’s y-factor is changed to -1, which makes it move up. Same applies to ‘S’ and the ‘down’ arrow that changes the y-factor to 1.
The ‘KEYUP’ event takes conditions that if any of the listed keys are released, that paddle’s y-factor is set to 0, which means it stops moving.
The next line is for collision detection. This is where that ‘listofGeeks’ we set earlier comes in. We use a ‘for’ loop to iterate both paddles. Pygame has a collision detection function called ‘colliderect’ which represents the invisible rectangle around the game’s objects. It checks for when the ball’s rectangle collides or overlaps with one of the paddles’. The ball and paddle’s rectangles are retrieved in the argument of this function. Since this line starts with ‘if’ that means it’s a conditional checking for the collision. If a collision is detected, the condition runs ‘True’ and it executes the ‘ball.hit’ method which is responsible for making the ball bounce off the paddle.
for geek in listOfGeeks:
	if pygame.Rect.colliderect(ball.getRect(), geek.getRect()):
		ball.hit()
This next ‘update’ is what solidifies the real-time aspect of the ball and paddles. Without this, everything would be motionless.
geek1.update(geek1YFac)
		geek2.update(geek2YFac)
		point = ball.update()
Next block solidifies the point system. We use -1 for geek1’s score so as to differentiate it from geek2’s. You can’t have the same variable for both players. Regardless, when that variable is met, it assigns a point to the respective player.
if point == -1:
	geek1Score += 1
elif point == 1:
	geek2Score += 1
Next 2 lines speak for themselves. It resets the ball when a point has been scored.
if point:
	ball.reset()
The rest of the code in this section displays the paddles, ball, players’ scores, and solidifies the frame rate.
geek1.display()
geek2.display()
ball.display()

geek1.displayScore("Geek_1 : ",
				geek1Score, 100, 20, WHITE)
geek2.displayScore("Geek_2 : ",
				geek2Score, WIDTH-100, 20, WHITE)
pygame.display.update()
	clock.tick(FPS)
The very last code is standard for Python games. It’s a condition that checks if the game is being run as the main program.
if __name__ == "__main__":
	main()
	pygame.quit()
Entire Code
import pygame

pygame.init()

# Font that is used to render the text
font20 = pygame.font.Font('freesansbold.ttf', 20)

# RGB values of standard colors
BLACK = (0, 0, 0)
WHITE = (255, 255, 255)
GREEN = (0, 255, 0)

# Basic parameters of the screen
WIDTH, HEIGHT = 900, 600
screen = pygame.display.set_mode((WIDTH, HEIGHT))
pygame.display.set_caption("Pong")

clock = pygame.time.Clock()
FPS = 30

# Striker class


class Striker:
		# Take the initial position, dimensions, speed and color of the object
	def __init__(self, posx, posy, width, height, speed, color):
		self.posx = posx
		self.posy = posy
		self.width = width
		self.height = height
		self.speed = speed
		self.color = color
		# Rect that is used to control the position and collision of the object
		self.geekRect = pygame.Rect(posx, posy, width, height)
		# Object that is blit on the screen
		self.geek = pygame.draw.rect(screen, self.color, self.geekRect)

	# Used to display the object on the screen
	def display(self):
		self.geek = pygame.draw.rect(screen, self.color, self.geekRect)

	def update(self, yFac):
		self.posy = self.posy + self.speed*yFac

		# Restricting the striker to be below the top surface of the screen
		if self.posy <= 0:
			self.posy = 0
		# Restricting the striker to be above the bottom surface of the screen
		elif self.posy + self.height >= HEIGHT:
			self.posy = HEIGHT-self.height

		# Updating the rect with the new values
		self.geekRect = (self.posx, self.posy, self.width, self.height)

	def displayScore(self, text, score, x, y, color):
		text = font20.render(text+str(score), True, color)
		textRect = text.get_rect()
		textRect.center = (x, y)

		screen.blit(text, textRect)

	def getRect(self):
		return self.geekRect

# Ball class


class Ball:
	def __init__(self, posx, posy, radius, speed, color):
		self.posx = posx
		self.posy = posy
		self.radius = radius
		self.speed = speed
		self.color = color
		self.xFac = 1
		self.yFac = -1
		self.ball = pygame.draw.circle(
			screen, self.color, (self.posx, self.posy), self.radius)
		self.firstTime = 1

	def display(self):
		self.ball = pygame.draw.circle(
			screen, self.color, (self.posx, self.posy), self.radius)

	def update(self):
		self.posx += self.speed*self.xFac
		self.posy += self.speed*self.yFac

		# If the ball hits the top or bottom surfaces,
		# then the sign of yFac is changed and
		# it results in a reflection
		if self.posy <= 0 or self.posy >= HEIGHT:
			self.yFac *= -1

		if self.posx <= 0 and self.firstTime:
			self.firstTime = 0
			return 1
		elif self.posx >= WIDTH and self.firstTime:
			self.firstTime = 0
			return -1
		else:
			return 0

	def reset(self):
		self.posx = WIDTH//2
		self.posy = HEIGHT//2
		self.xFac *= -1
		self.firstTime = 1

	# Used to reflect the ball along the X-axis
	def hit(self):
		self.xFac *= -1

	def getRect(self):
		return self.ball

# Game Manager


def main():
	running = True

	# Defining the objects
	geek1 = Striker(20, 0, 10, 100, 10, GREEN)
	geek2 = Striker(WIDTH-30, 0, 10, 100, 10, GREEN)
	ball = Ball(WIDTH//2, HEIGHT//2, 7, 7, WHITE)

	listOfGeeks = [geek1, geek2]

	# Initial parameters of the players
	geek1Score, geek2Score = 0, 0
	geek1YFac, geek2YFac = 0, 0

	while running:
		screen.fill(BLACK)

		# Event handling
		for event in pygame.event.get():
			if event.type == pygame.QUIT:
				running = False
			if event.type == pygame.KEYDOWN:
				if event.key == pygame.K_UP:
					geek2YFac = -1
				if event.key == pygame.K_DOWN:
					geek2YFac = 1
				if event.key == pygame.K_w:
					geek1YFac = -1
				if event.key == pygame.K_s:
					geek1YFac = 1
			if event.type == pygame.KEYUP:
				if event.key == pygame.K_UP or event.key == pygame.K_DOWN:
					geek2YFac = 0
				if event.key == pygame.K_w or event.key == pygame.K_s:
					geek1YFac = 0

		# Collision detection
		for geek in listOfGeeks:
			if pygame.Rect.colliderect(ball.getRect(), geek.getRect()):
				ball.hit()

		# Updating the objects
		geek1.update(geek1YFac)
		geek2.update(geek2YFac)
		point = ball.update()

		# -1 -> Geek_1 has scored
		# +1 -> Geek_2 has scored
		# 0 -> None of them scored
		if point == -1:
			geek1Score += 1
		elif point == 1:
			geek2Score += 1

		# Someone has scored
		# a point and the ball is out of bounds.
		# So, we reset it's position
		if point:
			ball.reset()

		# Displaying the objects on the screen
		geek1.display()
		geek2.display()
		ball.display()

		# Displaying the scores of the players
		geek1.displayScore("Geek_1 : ",
						geek1Score, 100, 20, WHITE)
		geek2.displayScore("Geek_2 : ",
						geek2Score, WIDTH-100, 20, WHITE)

		pygame.display.update()
		clock.tick(FPS)


if __name__ == "__main__":
	main()
	pygame.quit()
